Tweaking Vista’s Search feature
 Q: I made a leap from Windows 2000 to Windows Vista. I loved the simplicity and efficiency of 2000’s Search. One click on the Start button, click on Search, and there you had all the criteria for file searching. Your book talks about Vista’s Indexing feature, all based on a file’s name. Well, I produce so many files that I don’t always recall their names! Where is the date search? I have to click on Help and Support, then tediously find another link to search, then more reading, never telling me anything. What used to take seconds now takes minutes!
A: I don’t like Windows Vista, either. To be fair, though, Windows Vista searches not only by file name, but by the contents of many of your files. And you’re currently taking a roundabout method to fine-tune Vista’s Search. To solve your problems, try these tips to tweak Vista’s Search feature:
Search by Date. To search by a file’s date, or perform other advanced searches, press the Windows key, then press F3 to fetch the main Search window. Then click “Advanced Search” button in that window’s upper, right corner. There, you can search by a file’s creation date, or by the date the file was last modified, a handy way to find files you created last week, last month, or even years ago.
Add more file locations to the Index. If Vista’s Search feature still isn’t finding your files, or is taking too long, your file’s folders might not be located in Vista’s index. To add or remove folders to the index, follow these steps:
- Open the Control Panel.
- Choose the System and Maintenance category, and choose Indexing Options. (Or, you can click the Start button and type “indexing options” into the Search box.)
- Click the Modify button to add or remove locations.
The Indexing Options window appears, showing you which folders are currently indexed, and which are being left out.
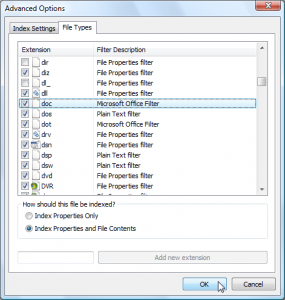
Add more file types to the Index. Adding new locations to the index won’t help if Vista’s ignoring your particular type of file. You can tell Vista which types of files should appear in the index, as well as which files should be indexed by their name and contents. To tweak what file types should appear in the Index, follow these steps:
- Open the Control Panel.
- Choose the System and Maintenance category, and choose Indexing Options. (Or, you can click the Start button and type “indexing options” into the Search box.)
- Click the Advanced button, and click the Advanced tab.
 There, you can check off a list of file types, shown to the left, choosing which file types should be included, as well as whether they should be indexed by name or name and contents. Not sure which file types correspond to which files? The File Extension Source Web site lets you type in a file’s extension to see which program created it.
Windows Vista’s Search feature isn’t perfect, but with just a few tweaks, you can usually make it meet your needs.
One more bit of trivia: Windows Vista originally came with not only the Search box along the Start menu’s bottom edge, but a Search command: The Search command would take you right to the main Search window. Microsoft removed the Search command from the Start menu with Vista’s Service Pack 1, hence the F3 command to fetch it.
Posted: September 29th, 2009 under Windows Vista.
Tags: F3, Search, search by date, Search command, tips, Vista Service Pack 1, Windows Vista For Dummies

